food

You are currently browsing the archive for the food category.

I actually wrote this months ago but didn’t have a picture to go with it. Now I can tell you it’s been tested multiple times.


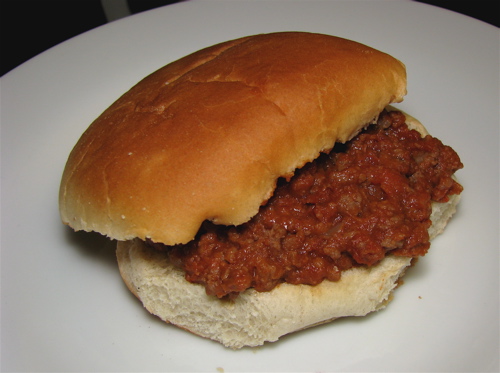
On the way to making chili I accidentally decided to make Sloppy Joes instead. I can’t remember how that happened. But the result was quite good and added an ingredient probably not usually found in Sloppy Joes—beans. Remember I was making chili. But my kids don’t eat red beans. Only black. Because one of their friends eats black beans, so they will eat the black beans, but only in certain dishes. Do they really taste that different? I guess so since I didn’t care for black bean chili. So I decided to purée the beans.

1.5 pound lean ground beef
1/2 can of pinto beans, puréed
1/2 large white onion, chopped fine
1 tsp minced garlic
1/2 teaspoon salt
3/4 cup ketchup
2 tbsp molasses
ground black pepper to taste

Sauté onions and garlic in a skillet over medium heat in butter or olive oil. Add ground beef, cooking until browned; drain. Stir in the ketchup, beans and molasses; mix thoroughly. Reduce heat, and simmer for 20-30 minutes. Season with salt and pepper. Serve on hamburger buns. Makes about 8 sandwiches.

My theory is that the beans help hold the mixture together. And about the molasses—the recipe I found online called for brown sugar, which I did not have. Since I knew that the flavor of brown sugar comes from molasses, I decided to just use that instead. It tasted fine and has the added benefit of a bit of calcium and iron. And if you use blackstrap molasses, there are even more vitamins and minerals.


sloppy joe

I guess they missed me. : )

A few pictures of things we’ve done over the last few months.

For Valentine’s Day we made corner bookmarks like this lighthouse one I made for our dear neighbor E. I cut 2.5 inch corners off of envelopes (red ones left over from Christmas cards were especially useful) and then attached 2 inch triangles of a different color or patterned paper to each side. The kids had fun mixing up colors and decorating with stamps, stickers and cut-outs from magazines and catalogs. We found the nursery/seed catalogs and the quilting fabric catalogs to be gold mines for this activity. You can find instructions for a similar corner page marker here at Tally’s Treasury.

lighthouse collage corner page marker bookmark

Then we stuck the bookmarks into these Valentine cards. I think I made up this sentiment myself, but it’s possible I heard it somewhere. In any case I found some free clip art online and made this card. I printed out enough copies for all the students in both of the kids classes and they colored and decorated as desired, making each one special for the recipient.

all occasion card for readers books world bookmark earth

I’m including links to the printable pdf version here if you’d like to use it, just print on cardstock or regular paper, fold in half and in half again. original Valentine’s Card. And the write-your-own-occasion card pictured above.

knitting a tapered skinny scarf with novelty yarn

I knit several skinny scarves out of novelty yarn. This is the sort of yarn that looks pretty or fun but you really don’t know what to do with, or at least I don’t. But I finally figured something out that is easy to make and looks good. With extra large needles, I knit loose garter stitch scarves about 3″ wide with a single ball of novelty yarn, about 75 yards, for a long accessory scarf that can wrap around the neck and hang down fashionably. These won’t keep you warm at all but they are fun to wear. Rather than making a blunt end I figured out how to increase and decrease to make tapered ends that give a little extra finishing touch. My construction notes are on my project page in Ravelry.

hand knit skinny scarf with tapered ends novelty yarn

rock candy crystals homemade kitchen science

The subject of gems and crystals came up and on the way to explaining how crystals grow, I decided we needed to do an experiment. This falls under the category of what I call kitchen science—real experiments you can do with stuff you already have around the house. Even though I know I’ve done this before, it took two tries to produce a sugar solution that grew several of these rock candy sticks. I used the instructions from About.com. Our crystals did not retain either the flavoring or coloring that we added to the solution. Nobody complained when it came time to eat them.

smashed pansy bookmark flower ink

I cannot remember why we did this but we had fun. The girl and I picked pansies out of the garden to make some smashed flower art. The colored juices from the plant are transferred to soft paper by force. I used some bookmark sized pieces of heavy paper left over from another project. We used a regular hammer, sandwiching the flower face down on the paper between a piece of paper towel on top and wax paper on the bottom, on top of a scrap piece of wood. I cut the green fleshy calyx off the pansy with sharp scissors after positioning it on the paper. You could use this technique to make cards, placecards for a summer meal, or even art to frame. Get more details on how to make prints from botanicals from this great post by Wendy of Build/Craft/Make/Bake. Too bad I read her post after we did this project but there is plenty of summer and plenty of blooms yet to try!

Tags: , , , , ,

Sour Cream Chicken Enchiladas

sour cream chicken enchiladas with fresh pico de gallo

I learned how to make this dish from my friend Stefanie quite a few years ago. It’s one of the few things I cook where I follow the recipe, mostly. The notebook paper is torn, faded and stained but I still get it out when I make this. It’s hard to go wrong with sauteed onions, chicken, and shredded cheese baked in a sour cream white sauce but we love it all the more because it reminds us of old times and old friends.

I think my mother learned to make lumpia from Filipino ladies whose husband’s were stationed on the Navy base in Iceland at the same time we were there. The filling is made of various cooked vegetables and ground meat wrapped in a thin wrapper almost like a crepe and then fried quickly in hot oil. As a child, I remember it was difficult to buy the wrappers and the packages had likely been frozen and thawed more than once. The paper-thin wrappers were often stuck together and it was my job to carefully peel them apart and hand them out to the adults who rolled the filling into the wrappers.

rolling lumpia filling

A few weeks ago my parents came down to see us and my mother cooked up a big batch of filling and three of us rolling made quick work, allowing us both to stock pile carefully bagged lumpia in the freezer for later enjoyment.

homemade lumpia and rice

My mother’s recipe for Lumpia

makes 75-100

1 1/2 – 2 lb ground beef (or other types of meat)
2 medium carrots (I use peeler)
1 medium cabbage, cut very thin
4-5 stalks celery, chopped small
1 bag of beansprouts
1 lb (approx) string beans, cut very thin
1 medium onion chopped
5 bay leaves
1/4 tsp chopped garlic
1 Tbsp salt
small amount of black pepper to your taste
1 Tbs vegetable oil

1. Fry garlic in oil; add gound beef, salt and bay leaves
2. Add onion and let it cook until translucent
3. Add cabbage and cook 2 minutes
4. Add bean sprouts
5. Add all the remaining ingredients and stir constantly until everything
is cooked
6. Add a dash of pepper
The total amount of cooking time is approximately 10 minutes.

Cool and drain the filling. Place 1.5 to 2 tablespoons of filling on a wrapper and bring up the bottom corner first. Fold in the sides and roll. Brush the last corner with beaten egg to seal.

To cook, heat two inches of oil in a heavy pot until a dry chopstick bubbles when dipped in the oil. Have a cooling rack of paper towel covered tray ready for the hot lumpia. Gently slide lumpia into the hot oil, turn as necessary to fry evenly to golden brown. Remove to rack to cool slightly before serving. I usually cook 4-6 per adult. Two per adult for an appetizer.

Did I get all that right mother? :^)

Then I decided to do a search on the term. Apparently the dish I have been calling shrimp en brochette for at least 15 years is only somewhat related. En brochette is French for food that is cooked and possibly served on a skewer. Generally that means grilled. And in the case of shrimp, at least here in the United States, it is accompanied by bacon, jalapeño pepper and cheese.

There was a little restaurant in Oklahoma City in the early ’90s called Pearl’s and they served up New Orleans style food and music. On our working part-time through college budgets we still managed to go a few times and enjoy their gumbo and shrimp en brochette. Here’s my home-cooked version of what Pearl’s called shrimp en brochette.

shrimp en brochette breaded with cornmeal and fried

Pearl’s Shrimp en Brochette (for 4 – 6)

20 large uncooked shrimp, peeled and cleaned
20 1/2″ cubes of a sharp cheese such as cheddar
thin sliced bacon cut into 1/2 or 1/3 strips, whatever will fit around your shrimp

I put the cheese in the middle of the curled shrimp and then wrap the bacon around and fix with a toothpick. You can also butterfly the shrimp and insert sliced cheese. Some recipes also call for a little strip of jalepeño with the cheese. I’ve never tried that and I don’t recall that Pearl’s put it inside either.

how to make shrimp en brochette battered with cornmeal and fried

Prepare one bowl with a beaten egg and a bowl with about 1 cup cornmeal, 1/2 cup grated parmesan, salt and pepper. Coat your skewered shrimp first in the beaten egg and then in the cornmeal mixture.

Heat oil in a deep skillet or dutch oven. Oil should be hot enough to make a dry chopstick release air bubbles. Have a metal rack or paper toweled plate ready. Lower the coated shrimp into the hot oil. It will only take a minute or two to fry to a nice golden brown. Remove to rack and allow to cool a bit before serving. Make sure to remove the toothpicks or at least warn your guests to do so!

Pearl’s served these with a cherry horseradish sauce which I’ve never tried to make, but I would guess it was similar to basic cocktail sauce but with puréed cherries and possibly tiny diced jalepeño, instead of ketchup or in addition to ketchup.

This is really too rich to eat as an entrée but it makes a tasty appetizer or a light addition to rice or a large salad.

Tags:

Last year we built a 4×8 foot raised bed for vegetables and herbs. I’ve been cooking with some of the herbs for at least a month now. It’s wonderful to walk out and just snip off what I need, rinse and chop it right into the pot.

Small leaf basil and curly parsley, we also have dill and chives

fresh basil and parsley from the garden

zucchini and summer squash picked small at around 5-6 inches, delicious fresh or cooked

fresh zucchini and summer squash garden

In a few more weeks I hope to have peppers, tomatoes and cucumbers from the garden as well as blueberries and strawberries from other spots in the yard.

Tags:

These little charmers are called spiderwort. I have no idea why. And the Latin name is rather a mouthful, tradescantia. They are perennials, native to the eastern seaboard. I received a few bedraggled plants last year, and they have adapted happily, blooming profusely this year.

pink and blue spiderwort flowers

My favorite fruit salads are usually composed mostly of berries—no bananas for me thank you. This one here has strawberries, blueberries, red plum and blackberries. I’m hoping that later this summer we’ll have blueberries off our own bushes, wild blackberries and maybe a few strawberries as well. Confession, I really don’t know the difference between blackberries and black raspberries. But I think maybe what we have in our backyard is not like these storebought blackberries so maybe they are actually black raspberries.

fruit salad strawberries blueberries plum blackberries

We had a dead tree taken down so I let the kids, ours and the neighbors, play on it for a few hours. They had a great time pretending the tree was a fort, a castle, a mountain, a nest . . . We also enjoyed, well, some of us enjoyed peeling back the bark and watching all the creepy crawlies shy away from the light. There was also a rather intense debate on the possible dangers of mushrooms and fungi. I stayed out of it for the most part but helped guide them to the conclusion that mushrooms were best left alone unless bought in the store or eaten at a restaurant.

Tags: ,

Area farms that make maple syrup open their gates to the public on the last weekend in March around here. This was the first year that we were able to make the timing work. Having recently watched a horse movie, we chose to visit the Cooper farm where they raise miniature horses, creamy white Charolais cattle, and a number of exotic birds as well as tapping their maple trees and keeping bees. The air was crisp but sunny and we enjoyed the walk around the farm squishing our boots through the Maine mud and ending up in the warm, steaming sugaring house, drinking in the smells of wood smoke and maple sap cooking down into syrup. A sampling of maple syrup drizzled ice cream provided the happy ending. We brought home powdered maple sugar, some maple cotton candy (the only kind of cotton candy worth eating), and local honey.

miniature horse

pheasants, peacocks and chickens

IMG_9696

running jumping on shrink wrapped hay bales

IMG_9702

Tags: ,

The boy’s class had an Arctic Celebration this evening complete with readers’ theater, songs, artwork, games and snacks, and surprise—snow—so appropriate to the theme and late March in Maine.

handmade cookie cutter polar bear

I had volunteered to bring something baked and at the last minute (not a surprise) I decided that I just had to make polar bear shaped shortbread. Had to. A piece of aluminum roof flashing, a pair of pliers and a few minutes of careful bending yielded a serviceable cookie cutter in a graphically simple shape of a polar bear reminiscent of Inuit sculpture. The boy helped me make the simple shortbread dough and we had just enough time to bake the bears before heading off through the snow to see his classmates and their families at the school.

Tags: , ,

cookie cutter heart-shaped watermelon fruit valentine

Who knew preparing for Valentine’s Day could be almost as hectic as Christmas? Between the boy and the girl we made thirty-plus valentines over the last two weeks. The girl was asked to bring in watermelon for a shared snack in her class today. She was already excited about that because she loves watermelon. Halfway through slicing the rather small melon I wondered if I could somehow cut the quarters into heart shapes like I do with strawberries. No, but I could use a heart shaped cookie cutter! So simple, but I have once again upped my genius quotient with the girl. Yay, me. And really no waste as I just cut up the very small leftover to be eaten at home.

These could easily make a whimsical but very grown up dessert with a small scoop of sorbet and perhaps a mint leaf or a few tiny berries for garnish.

Tags: ,

snow cream vanilla cinnamon

Once or twice a winter when we get a nice big snow I collect a bowl of clean snow and we pour in some milk or cream, a little sugar and some vanilla. Stir it up and you have snow cream. The first time we made it I was surprised how good it tasted. Or maybe anything sweet tastes good after you’ve been running around outside. The pink snow cream was flavored with just a drop of cinnamon oil and was highly favored by the boy and me. Surprisingly the girl preferred the plain vanilla despite her general preference for all things pink.

Tags:

I haven’t been posting so much lately. I’m not really sure why. I thought I would have more time to myself with the girl in afternoon kindergarten. It doesn’t seem to have worked out that way. But I suppose I have been able to volunteer at both of the schools.

Various photos:

socks handknit from self-striping yarn

This is the second pair out of the same ball of self-striping yarn. Matching socks for the boy and his sister.

dyed wool blanket remnants scraps

These are scraps of an old wool blend blanket that the boy and I dyed various colors. It was originally a light green and the boy had a great time seeing what would happen when we overdyed with various colors. It took the dye fairly well but unfortunately it did not felt well. That may change the intended use.

swatch of eyelet lace border

Swatch of eyelet lace border that I originally improvised for the strangling vine lace scarf. Someone on Ravelry saw my project photos and asked about the border. I had already gifted the scarf so I had to look at the photos to try and figure out what I had done. I hope I got it right. Although the pattern is quite simple, I have a hard time remembering to stop and write down what I am doing. Probably why I didn’t write it down in the first place. So my Ravelry notes for this are now out there and I really hope there aren’t any mistakes for the sake of anyone who may try to knit from them.

homemade chili in iron pot

This one because you need a food photo don’t you? Recently I have made chili with pulled chicken instead of beef in it and I like it very much. I use poached chicken thighs and pull the meat apart with two forks. And I always put the diced green pepper in just before serving so they stay nicely crunchy.

Tags: ,

or alternately: How to get your kids to joyfully destroy a pound of Halloween candy in an hour without eating any of it

My friend Krista mentioned a website, candyexperiments.com, that gives suggestions for using candy to do simple science experiments with kids. (Check out Krista’s pictures, she must have been a lot more organized than I was.) The catch of course is to get your kids to willingly give up their candy right? We’ve done some household science experiments before so I knew that would be a good draw. I explained to the boy and his sister that they could each pick out 5 pieces of candy and then we would do science experiments with the rest of it. The boy looked thoughtful for a moment and then readily agreed. Sister followed suit.

I pulled out several heavy clear glass bowls, a bunch of spoons, cold water, hot water, baking soda, salt and lemon juice. The best part is the stirring of course. We tested to see what temperature of water dissolved candy faster. We used baking soda to test which candies were acidic (acid plus baking soda equals bubbles.) We dropped hard candies into boiling water to watch them crack. We all made a guess on which candy might float and then tested to see who was right. The girl picked Charleston Chews, because they are white in the middle. I don’t know about her logic but they did indeed float! We were also surprised to find that the addition of salt to one of the bowls of candy made the candy corns pop up to the top.

We also put a bunch of candies on a cookie sheet and watched them melt, crack open, and even change color in the oven. We were surprised to see that candy corn melts, bubbles and then turns transparent and cools into a hard glassy puddle. It was all rather chaotic, and the candy disappeared faster than I would have guessed.

candy melting and cracking in the oven

I managed to save some M&Ms for one particular experiment found on candyexperiments.com. I started with a clean bowl of water and very carefully dropped in different colors with the “m” face up. It was hard to be patient but we were rewarded with a rainbow of colors as the candy shells dissolved and the neatest trick of all: the white “m” floated up to the surface of the water!

m&m candies dissolving in water letter "m" floats

Tags:

This:

raised bed garden

grew these:

home grown roma tomatoes

and became this:

tomato sauce from home grown garden tomatoes

About three times over the course of the last few months. All from three roma tomato plants. I was also able to throw in our own parsley and chives into several batches of tomato sauce. And I even added some puréed squash to the last batch. Next year I’ll be looking for one of those handcranked tomato presses. The zucchini and the cucumbers didn’t produce much, maybe the heat? And an unknown visitor kept sampling the beans, but otherwise we had very little problem with pests. Fresh mint and dill made it to the table quite a few times, mmmm.

We haven’t had a really hard frost but enough to wilt most of the tender garden. The parsley will produce until it gets buried in snow. This is the first year we’ve had a garden in several years and I’m looking forward to next year already.

Tags:

This is a yours truly mash-up of two classics—New England brown bread and bread pudding. Brown bread is traditionally made with equal parts of wheat, rye and cornmeal, sweetened with molasses, and then steamed in a can, rather than baked, producing a satisfyingly rich but moist loaf. Bread pudding is made all over the world of course. A mixture of milk, eggs, sugar and spices are poured over stale bread and baked into a homey dessert. I’ve never heard of anyone else doing this but I make bread pudding using brown bread.

Here’s a little history and arecipe for brown bread from Epicurious, or you can do as I do and buy a can of B&M Brown Bread, made right here in Maine. My first experience with brown bread was through a care package from my mother-in-law when we were living in Oklahoma. I learned to love this curious dark bread that came out of a can, we ate it sliced thick and smeared with cream cheese or warm with butter.

B&M brown bread

When we first moved to Maine several years later, our first apartment was less than a mile from the old brick factory situated just where the Back Cove meets Casco Bay. We passed by nearly every day and when the wind was right, the scent of baked beans would compete with the salt air.

b&m Burnham and Morrill baked bean factory Portland Maine Casco Bay Back Cove

It was several years later when I came up with the idea to make a bread pudding using brown bread. I really can’t remember what inspired me to try it. I sliced the bread thick and cut it into cubes and then toasted the cubes a bit in the oven. Then I dumped the bread into a deep round casserole dish and poured the pudding mixture over it and baked. It was well received by our dinner guests, a thoroughly Maine couple. This past weekend I made a double batch for friends at Camp Gander Brook. Brown bread pudding seemed like a fitting finish for a casual dinner in the lodge, the October chill held off by a warm fire crackling in the massive stone fireplace and the laughter of our children as they played under the old wood-beamed ceiling.

brown bread pudding in a cup topped with whipped cream

Recipe for Brown Bread Pudding
serves 6-8

4 beaten eggs
2 1/4 cups milk
1/4 cup sugar
1 tablespoon vanilla
1/2 teaspoon cardamom*
1/2 teaspoon cinnamon
1 can brown bread cubed and toasted in 350° oven for 15 minutes
(1/4 cup raisins or dried cranberries, if desired)

Beat all ingredients together except for the bread cubes. In an ungreased 2 quart baking dish, pour egg mixture evenly over bread cubes (and dried fruit). Bake in a 350° oven for 40 to 45 minutes or till a knife inserted near the center comes out clean. Serve warm with a dollop of whipped cream or vanilla ice cream.

* If you don’t have cardamom, substitute nutmeg or use a full teaspoon of cinnamon.

Tags:

« Older entries