I guess they missed me. : )
A few pictures of things we’ve done over the last few months.
For Valentine’s Day we made corner bookmarks like this lighthouse one I made for our dear neighbor E. I cut 2.5 inch corners off of envelopes (red ones left over from Christmas cards were especially useful) and then attached 2 inch triangles of a different color or patterned paper to each side. The kids had fun mixing up colors and decorating with stamps, stickers and cut-outs from magazines and catalogs. We found the nursery/seed catalogs and the quilting fabric catalogs to be gold mines for this activity. You can find instructions for a similar corner page marker here at Tally’s Treasury.
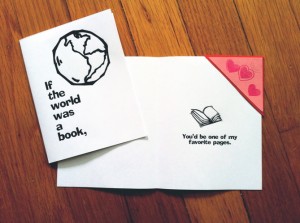
Then we stuck the bookmarks into these Valentine cards. I think I made up this sentiment myself, but it’s possible I heard it somewhere. In any case I found some free clip art online and made this card. I printed out enough copies for all the students in both of the kids classes and they colored and decorated as desired, making each one special for the recipient.
I’m including links to the printable pdf version here if you’d like to use it, just print on cardstock or regular paper, fold in half and in half again. original Valentine’s Card. And the write-your-own-occasion card pictured above.
I knit several skinny scarves out of novelty yarn. This is the sort of yarn that looks pretty or fun but you really don’t know what to do with, or at least I don’t. But I finally figured something out that is easy to make and looks good. With extra large needles, I knit loose garter stitch scarves about 3″ wide with a single ball of novelty yarn, about 75 yards, for a long accessory scarf that can wrap around the neck and hang down fashionably. These won’t keep you warm at all but they are fun to wear. Rather than making a blunt end I figured out how to increase and decrease to make tapered ends that give a little extra finishing touch. My construction notes are on my project page in Ravelry.
The subject of gems and crystals came up and on the way to explaining how crystals grow, I decided we needed to do an experiment. This falls under the category of what I call kitchen science—real experiments you can do with stuff you already have around the house. Even though I know I’ve done this before, it took two tries to produce a sugar solution that grew several of these rock candy sticks. I used the instructions from About.com. Our crystals did not retain either the flavoring or coloring that we added to the solution. Nobody complained when it came time to eat them.
I cannot remember why we did this but we had fun. The girl and I picked pansies out of the garden to make some smashed flower art. The colored juices from the plant are transferred to soft paper by force. I used some bookmark sized pieces of heavy paper left over from another project. We used a regular hammer, sandwiching the flower face down on the paper between a piece of paper towel on top and wax paper on the bottom, on top of a scrap piece of wood. I cut the green fleshy calyx off the pansy with sharp scissors after positioning it on the paper. You could use this technique to make cards, placecards for a summer meal, or even art to frame. Get more details on how to make prints from botanicals from this great post by Wendy of Build/Craft/Make/Bake. Too bad I read her post after we did this project but there is plenty of summer and plenty of blooms yet to try!


