applique

You are currently browsing articles tagged applique.

drawstring top project bag with clear vinyl bottom

I made this project bag for a swap on Ravelry. I chose the black vinyl for the main fabric on the outside because I thought it would be easier to keep clean and it would give instant rigidity to the bag without the need for additional support. The cotton print lining peeks up about 4 inches to make the drawstring top. There is also a little inner pocket made out of the same print and if I make another one of these bags I will use a contrasting fabric to make it easier to see. The main feature I wanted to try out was making the bottom of the bag out of clear vinyl. I personally tend to forget what is in a container if I can’t see through it. Any kind of container. So I thought a little window on the bottom would make it easy to check what was inside if you put your project aside for a while or if you have too many project bags! While the rest of the bag went together fairly easily, I did not figure out a good way to work with the clear vinyl. But I will try again!

faux leather vinyl cylinder project bag

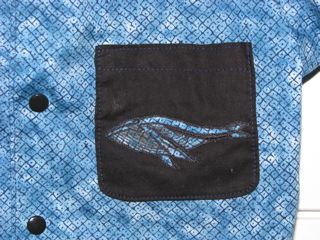
The recipient likes dachshunds so I did a little reverse appliqué dachshund on the outside of the bag in the same print. It was not hard to do. Since the vinyl does not ravel when cut, there was no need to turn the edges under. I just put a scrap of the cotton print behind the opening which I cut with a craft knife, and then stitched around the edge of the cut-out on the sewing machine. Fun and easy personalization.

Tags: ,

I think I had to go out at least once every day last week, no picnic for a hermit like me. But I made it through the “princess” a.k.a. Royal Banquet on the Greene birthday party yesterday. It was a little chilly but sunny. The girl and her brother and six little friends enjoyed croquet and crafting bejeweled felt crowns as well as munchies, chocolate cake and pink lemonade. The girl has been planning this party for months. She’s quite opinionated but I figure she’s only 4 once so I would try to accommodate. I think everyone had a good time. Even the boys. The stage was set with a borrowed canopy, an old jewel toned backdrop of a court jester, and a fabric draped throne.

Here she is, the princess holding court, in the dress I made from two colors of stretch pink velveteen I bought months ago from fashionfabricsclub.com. I ended up making my own pattern but the fabric turned out to be quite easy to sew once I finally started.

"princess" dress for a four year old, my own pattern

Her brother, wearing the felt crown he decorated for himself and choosing his croquet mallet with care. He takes this game very seriously.

boy wearing felt crown with stick on jewels

The cake. Three tiers of fluffy German chocolate cake baked in borrowed heart shaped pans. Too late I realized that I had never made any other frosting than chocolate! I am not much of a baker. So I just picked a recipe out of the Betty Crocker cookbook which I had to retrieve from a box in the basement despite the fact it’s been a year since we moved in. Pink frosting did not behave as I was used to! But it tasted fine.

three layer heart shaped pink icing chocolate cake with strawberries and blueberries

Face painting by my friend Jan. This was quite popular with the boys and the girls.

face painting at birthday party

Our sweet little neighbor.

toddler in ruffly skirt holding a pink crown

Opening presents. In the background is the banner I designed for a fund-raising party with a royal theme quite a few years ago. Thankfully I did not have to sew these 5′ x 8′ monsters myself. All I did was cut and iron on the gold lamé appliques which was quite a job in and of itself. There were actually several of them made and I kept them afterwards knowing that eventually another occasion for their use would present itself. Voila, a princess birthday party.

princess birthday party with jester banner in background

I’m pleased that by borrowing a few things, reusing things we already had and making the refreshments myself, I was able to create the royal party my daughter wanted without spending much actual cash. However, I may have to hire a maid to help me clean up the mess I made!

Tags: , , ,

The boy finally lost his first tooth this week. I think he was feeling a bit left out as quite a few of his friends had already lost their first teeth. There was much dancing and singing. While the boy was gone to school I decided to make a tooth pillow so the “tooth fairy” would be able to find the little tooth under the boy’s pillow that night. I thought about doing some needle felting but ended up using embroidery floss to stitch a little face on the tooth and blanket stitch to stitch the tooth shape onto the pillow and finish the edges as well. I left a little opening at the top of the tooth big enough for a quarter (according to the song the boy learned in school, bless that music teacher!)

hand made felt tooth fairy pillow

I don’t do embroidery or cross stitch too often but occasionally I like to do it, especially on a small project like this where there are immediately satisfying results. After I was done with the tooth pillow I was reminded of this Japanese craft book that my aunt gave me years ago. It’s full of adorable felt people, animals and plants. The boy and the girl have already picked out projects for me to do, of course.

Japanese craft book of felt people, animals and plants

Tags: ,

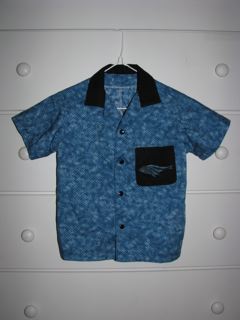
This shirt started out as 9″ wide scraps of Kona Bay faux shibori pattern cotton fabric in a lovely shade of ocean blue. I thought it was perfect for a summer dress shirt for the boy but I was limited by the size of the scraps I had. I fiddled around a bit and managed to eke out the body pieces by piecing the back of the shirt and cutting the collar and pocket from contrasting black. Rather than buttons, I applied black resin snaps to complement. I appliqued a humpback whale to the pocket and drew in the details with my favorite permanent fabric pen, Identipen.

Tags: , , ,