sewing

You are currently browsing the archive for the sewing category.

I haven’t posted anything to the blog in quite a while. I’m not sure how that happened. School started. And September birthdays and Halloween and November birthdays and Christmas holidays and somehow it’s February. I have been making things and doing things and even taking some pictures. At first I wanted to go back and post things in chronological order, then I thought maybe I should just do a summary with a bunch of pictures. But I guess it really doesn’t matter.

So here is the decorative shower curtain that I started about two years ago. Seems like an appropriate project to break my break. I have a bad habit of getting stuck on a project and putting it into time-out for a while. I work on other things, hope that a solution will come to me and eventually it will come back around. I’m trying to get myself out of that cycle and just make myself work through whatever difficulties arise instead of waiting months or years in between. When we moved into this house, the little bathroom was bright, shiny and completely white. I wanted to do something fun and seized on this cute fish fabric as my inspiration.

Heather Ross mendocino fish blue orange shower curtain

The feature fabric is Mendocino Swim Class in the Pacific colorway by Heather Ross. I loved this fabric so much I used it previously as an accent in a dress for the girl along with the seahorse fabric from the same line. This time I paired it with a solid Kona cotton coordinated to the tiniest fish and a little bit of navy blue piping left over from this project. I started this so long ago I don’t remember why I had to try the curved piecing. I see that it’s not obvious in the photo but the line between the two fabrics is gently curving.

I lined the shower curtain with extra wide white muslin and that is where the trouble began. For some reason I had a horrible time getting everything square and lined up nicely. You can probably still see crease marks in the fabric from where I wadded it up and threw it in the corner. My other difficulty was that I had my heart set on orange grommets. Dritz does make some colored plastic grommets but they were a tad expensive for my taste. And large. Don’t get me wrong, I like orange. It is probably my favorite color now. (Yes this is strange because I spent the first half of my life hating orange.) But a little orange goes a long way. So I bought the plain little silver colored grommets and dipped them in orange tinted Plasti-Dip. Easy-peasy. I have all kinds of other ideas for this weird but cool hardware store crafting find.

Heather Ross mendocino pacific orange blue navy shower curtain

Tags: ,

drawstring top project bag with clear vinyl bottom

I made this project bag for a swap on Ravelry. I chose the black vinyl for the main fabric on the outside because I thought it would be easier to keep clean and it would give instant rigidity to the bag without the need for additional support. The cotton print lining peeks up about 4 inches to make the drawstring top. There is also a little inner pocket made out of the same print and if I make another one of these bags I will use a contrasting fabric to make it easier to see. The main feature I wanted to try out was making the bottom of the bag out of clear vinyl. I personally tend to forget what is in a container if I can’t see through it. Any kind of container. So I thought a little window on the bottom would make it easy to check what was inside if you put your project aside for a while or if you have too many project bags! While the rest of the bag went together fairly easily, I did not figure out a good way to work with the clear vinyl. But I will try again!

faux leather vinyl cylinder project bag

The recipient likes dachshunds so I did a little reverse appliqué dachshund on the outside of the bag in the same print. It was not hard to do. Since the vinyl does not ravel when cut, there was no need to turn the edges under. I just put a scrap of the cotton print behind the opening which I cut with a craft knife, and then stitched around the edge of the cut-out on the sewing machine. Fun and easy personalization.

Tags: ,

Sometimes I get an idea and even though I know it’s crazy, I can’t get it out of my head so I do it anyway. This was one of those ideas. Not only is the skirt of this baby dress made from fabric, the bodice portion is both knit and crocheted. I’m not an expert in either knitting or crochet but I’ve done enough of both that there are certain usages that feel more comfortable in one or the other. So it was easier for me to switch back and forth between knitting and crochet rather than to make the whole bodice in one or the other. I’m not explaining this very well am I? Anyway, I’m pleased with how it turned out and you can see a picture of the dress modeled by the recipient on my Ravelry project page. There are also some more pictures and detailed notes there.

fabric skirt knit crochet bodice baby dress and bloomers

This is sized for 6-12mo. Making baby clothes for a baby you have never seen is always risky business so I poured over clothing measurements and knit and crochet patterns to figure out the right dimensions. I remember that when my girl was that age you didn’t want a dress that was too long because it got in the way of sitting up and crawling. It was also mostly useless to have any dress that didn’t have matching bloomers or tights because by the time you found something to cover the diapered bum that didn’t clash, she’d grown out of the dress. So the matching diaper cover was made from a Simplicity sewing pattern.

back of knit and crocheted dress bodice showing buttonhole straps

I’m rather proud of the little detail I thought of for the straps. I crocheted them with buttonholes along the entire length. The smallish buttons are on the inside of the back of the bodice. This way the straps are fully adjustable and can be worn crossed or uncrossed without looking like overalls. Don’t misunderstand, I love overalls on babies, but the regular overall style closure on the front wouldn’t have been suitable for this dress.

Tags: , , ,

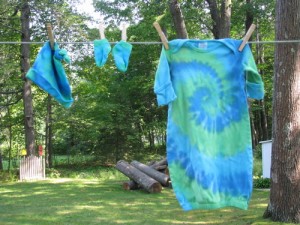
What started out as a blank white cotton knit baby gown eventually became a colorful sleeper with an unusual snap opening across the back. It started this summer when I decided to do some tie dye for the baby. I used my favorite colorway, seaglass, on a white baby gown from Dharma Trading.

tie dye baby gown bunting

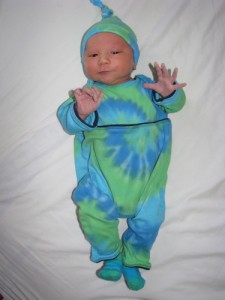
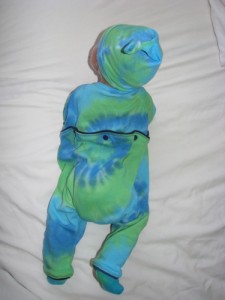
Much later I decided that I would like to make a tie dye romper but I didn’t really have time to order a blank and it was getting rather cold to be doing tie dye. So I looked at the beautifully colored gown and thought long and hard before cutting into it. I dug out a favorite newborn sleeper with an unusual opening across the back that I remembered made it easy to change diapers—a definite factor in how often an outfit gets worn by the baby. I took a deep breath and started cutting and ripping out seams. I added some navy blue knit trim and a few snaps and eventually finished turning the gown into a romper without disturbing the existing tie dye pattern much. The matching socks and hat make for a cute outfit.

tie dye baby sleeper snaps across back tie dye romper

Tags: , , ,

I’ve managed a little sewing in the last week. I made four wool diaper covers for the baby, all side snapping wool, my favorite. I used a single layer of the thicker red boiled wool and double layer of blue merino interlock. Each of them is a bit different as I tried out some different techniques and adjusted the pattern. I found the interlock soft but difficult to work with. The army green cover was made for the girl when she was a baby and I think the fabric came from a skirt my mother had made herself. The white cover is not wool at all but PUL lined in microfleece and was made for the boy when he was a baby, before I discovered the advantages of wool. The wool covers just need to be patted down with my favorite lanolin balm from Sudz ‘n’ Dudz and they’ll be ready to go. All the cotton and hemp/cotton diapers have been pulled out of storage and sit in a bin washed and waiting.

side snap wool diaper covers

Another variation on lengthening pants for the boy. This time I cut up an old flannel shirt and gave it a bit of body and thickness with fusible fleece. The faux cuffs do not turn up. I cut off the shirt pocket and sewed it on one leg as a useful and decorative accent. He said they looked “old-fashioned” but wore them anyway. If I do this look again I think I’ll use denim or khaki backed with the flannel rather than the doubled flannel so the cuffs can actually be turned up. But hopefully he’ll get a few more months wear out of them this way. He keeps getting taller but his waist isn’t getting any bigger!

boys pants lengthened with cuffs from flannel shirt

Tags: , ,

IMG_0578

The ballerina kitty and the black ghost ready to trick-or-treat in what’s left of a rather early snowfall. Last year’s ninja masks got reused with a few minor changes. Most everything else came out of their closets or from the Goodwill store. Ballerina kitty was inspired by the cat eared headband and got a black tail sewn on from a length of black feather boa from the craft store.

adult Luigi and Mario hat costume

Here’s Rich coming home from work wearing his Luigi costume. One of his co-workers was Mario. I made their hats. Rich’s was made from tee shirt material leftover from turning a short sleeve tee into a long sleeve tee.

And here’s the candy corn wig I made for answering the door. The pattern is Hallowig by Megan Reardon.

candy corn wig hat

Tags:

And because I’m obviously behind on posting what I’ve been doing so I might catch up a little faster if I just dump a bunch of pictures into one post. Not as much story but you get the idea.

This is a basket/bag (Ravelry link) knitted in the technique called mosaic knitting which I did for a KAL (knit-a-long). The boy has claimed it for his own. The technique creates a thick two color fabric without the usually gyrations required of colorwork.

mosaic knitting two color basket

I had a black tee-shirt left from the boy’s Ninja costume last year. The boy has always liked owls, but we recently watched the movie Legend of the Guardians: The Owls of Ga’Hoole which refueled the owl interest in our house. I handpainted just the eyes, top of the head, beak and a bit of shoulder to suggest an owl staring out of the darkness. I really like how this turned out.

hand-painted owl in the dark tee shirt

owl face hand-painted on black T-shirt

And another skirt for the girl, recycled out of a pair of my old corduroys. I used the fabric but I only kept the hem and side seams and carefully recycled the back pockets. There are pleats in the front and elastic in the waist. It’s in a longer length as requested. I also used some of the fabric from the pants to lengthen a favorite pair of pine green corduroy pants that still have a lot of room in the waist. No picture of that, oops! but similar to what I did to the boy’s pants here.

hand sewn brown corduroy girl skirt

back patch pocket detail on handmade corduroy girl skirt

And the reason behind all the sewing? Besides the motivation of school starting and cooler weather, I spent about a month and a half knitting a sleeveless sweater for myself that turned out . . . well, about the way I expected but I didn’t care for it at all. Sort of turned me off knitting for a bit. I’ve also been working off and on with a bench the boy and I rescued from the side of the road. One corner was in quite poor shape but the rest of it was well made with good quality hardwood so I decided it was worth some work. I’ve cut mortises and tenons, drilled holes of all sizes and mixed and shaped epoxy type filler and sanded, sanded, sanded. I’m not quite done yet but there will be a post with pictures of the transformation when it’s done, since we have about a month left to enjoy it before it gets too cold for this year.

Tags: , , , , , ,

I think those are the right descriptive words. I’m proud of myself for making quick work of the math it took to make this pattern. I may need to make a few adjustments but it worked out pretty well. And I used up some chambray remnants to achieve the look of denim without the weight. The girl had requested a jeans skirt, but one that she could play in. Since she’s quite the monkey, that meant it had to have lots of room to move in.

rounded yoke, flared circle skirt for girl

Here’s a detail of the waist which I made adjustable by putting elastic in the back and sets of snaps in the front. When she grows past the smallest snap I can cover the one that will show with a brass cap which I think will look fine. It would have been better with buttons but this machine does not make the best buttonholes and I was more interested in getting the skirt finished.

adjustable waist skirt using snaps

I take neither credit nor issue with her choice of accompanying garments and accessories. . .

flared chambray denim jeans skirt

Tags: , ,

monster stuffie supplies, wool felt, buttons, zippers

This started out as a project to make monster stuffies. The boy and I had done some sketches several months ago, so I pulled those out and made patterns. The girl and I pulled out colors and colors of wool and rayon felt, the jar of buttons, snaps, zippers and other odds and ends. The original idea called for using a functioning zipper for the mouth which would create a belly pocket. This took a little thinking but it wasn’t all that hard. I had hoped this would be easy enough for the kids to do a lot of the work. The wool felt is pretty thick to sew through so they did parts of it but some of it was just too hard. We stuffed the bodies lightly with poly pellets and wool stuffing.

We each made one stuffie and it turned out that we each chose a different one of the three patterns I had made. The girl stayed true to the original monster theme but the boy’s morphed into a caricature of Spider-Man and mine turned zoomorphic and became an owl. For some reason we have had a lot of owl “sightings” lately—Legend of the Guardians: The Owls of Ga’Hoole (an excellent movie by the way), a non-fiction book about owls from the library, the kids have been hooting at the neighborhood owls, and when we went to get the girl her first backpack, she chose one with a cute forest scene, complete with . . . owls.

Happy Monster:
monster stuffie character wool felt button eyes and zipper mouth

Intense Superhero:
Spider-Man inspired zipper pocket stuffie

Silly Owl:
wool felt hand sewn owl stuffie with zipper pocket belly

This was a fun project and I think we’ll make more of these to give away as gifts. I’d particularly like to find some patterned wool to turn into felt to use on these stuffies.

Tags: , ,

swim skirt

The kids are taking two weeks of swim lessons and they needed goggles and a swim cap for the girl. Goggles I can see getting a good bit of use out of and they seemed like a good incentive for the boy who was a little cautious about swimming in a pool. We generally have our summer water fun at the beach.

Frantically looking around the house for a bit of swimsuit material to make a cap from lead me to the little skirt that matches the girl’s swimsuit. I found an adult size swim cap pattern on the internet and sized it down to fit her head. I made myself sew a rough draft from part of an old tee shirt. There was so little fabric in the skirt that I had only one chance to get it right. I even had to undo the seams in order to have enough fabric rather than simply cutting the seams off as I would usually do when repurposing. I managed to eek out the pieces, sewing up the cap using the elastic and lycra waist trim to finish the bottom edge of the cap. The sewing itself turned out to be quite easy and I’m glad I decided to be frugal because I think the matching cap turned out much cuter than anything we could have bought.

Voila, my bathing beauty!

toddler, little girl swim cap

Tags: ,

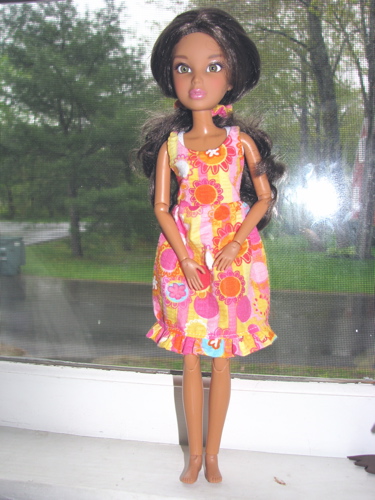
fashion dolls shirred top hand sewn dress

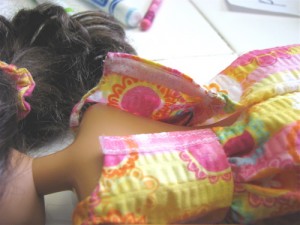
The girl chose this fabric out of my scrap bin for a new dress for her Liv fashion doll, Alexia. I decided to try shirring the top since I’ve never done shirring before. I couldn’t find the elastic thread anywhere so I ended up couching a line of zigzag over cord elastic. That worked out okay but it’s a little heavy at doll size. I also used the black elastic cord for the doubled shoulder straps which makes it easy to put the dress on the doll.

Next to Alexia is Roger (named by the boy), who is sadly still wearing the polyester duds he came with. The manufacturer didn’t even give him shoes, poor guy. I think sandals are in order for both dolls.

Tags: ,

For a school field trip, the girl’s class was required to dress in orange shirts. The girl’s teacher was less than thrilled and I do have to admit that orange is not a common color in the girl’s wardrobe. The girl does have a tie-dyed orange tee shirt handed down from her brother that she could have worn but . . . I just can’t leave well enough alone.

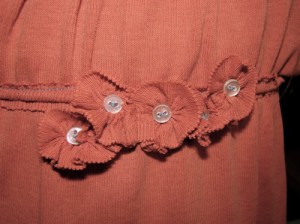
So I took apart a tee shirt of mine in a nice pumpkin pie color. I modified a peasant shirt pattern with a little inspiration from a tee in the girl’s closet featuring raw edges. I had no thread that looked remotely suitable so I pulled out a directly contrasting slate blue and stitched away. I used the neckline trim to create an elastic casing for the neckline and empire waist. Having run out of the round cord I stitched some gathers into the sleeves by hand. I gathered strips cut from leftovers into rosettes and sewed tiny buttons to the centers, placing one on each sleeve gather and a grouping of five off-center on the empire waist. It turned out really cute I think. And the girl loved it.
pumpkin orange raw edge peasant tee

raw edge hand stitched gathered flowers rosettes with button centers

Tags: , , ,

I received a very polite e-mail from a reader asking about the pattern for the cyclette bag (see here and here). I had intended to write up the pattern with pictures and apparently didn’t get around to it. Not a surprise. But looking back through the pictures I did actually make three of them! Which is a lot for me, I rarely make two of the same thing. But I didn’t take process pictures of any of them, waah.

So I decided to make another one and write up the instructions and take pictures along the way. It turned out to be a bit more involved than I had thought it would be. None of the sewing is particularly difficult, there were just more steps than I remembered. It is a rather clever construction (If I may say so myself) and requires no hand sewing but all seams are neatly enclosed. I’m not sure how I will proceed with formatting this one. The pattern lends itself to a few variations, which I may play out in order to incorporate into the finished pattern/tutorial.
But here are the pictures of the latest cyclette bag, inspired by the musette bag or feed bag carried by cyclists. The bag is sized to hold lunch and a water bottle, plus your wallet and keys in the inner zippered pocket.

random-charm's cyclette bag musette bag cyclist tote inside zipper pocket detail tote bag

Tags: ,

We’ve had rather a lot of rainy days this spring. Yesterday it was dry enough that the kids got outside and went crazy for a few hours. I think there were 6-7 kids running between our house and the next door neighbor’s. Today back to rain.

Liv doll Barbie Blythe hand sewn handmade dress

I made this sunny dress and matching hair scrunchie out of some scraps for the girl’s Liv doll, Alexia. I didn’t have a pattern and I didn’t make one either. I just sort of cut and pinned as I went along. Which is great in that it went together fast and relatively painlessly for such small work but not so great in that I would have to do the same amount of work to duplicate it. But I rarely do the same thing twice so it probably doesn’t matter much.

I used the ultra thin clear velcro that I found at the hardware store. It says that it is not recommended for fabrics but I ignored that of course. It did stick to the fabric enough to make it easy to work with and it was quite easy to sew through. I just cleaned a bit of adhesive off the needle when I was done. The closure is neat, easy to open and close and barely noticeable. Now she just needs some sandals and a sunny day!

micro thin clear velcro closure on handmade doll dress

Tags: ,

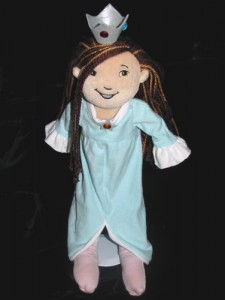
Rosalina is a character from Super Mario Galaxy, a game for the Wii, which builds on the story of the long running Nintendo video game characters—plumber brothers, Mario and Luigi. She is the benevolent caretaker of baby stars called lumas. I previously made a few lumas out of felt for the kids.

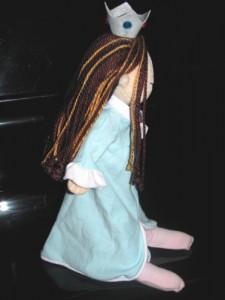
The girl recently requested a Rosalina dress for her Groovy Girl doll, Sarah. Since she plays with Sarah quite a lot, I decided it was worth doing. I had several fabric choices in my stash and could have gone with a dressier velvet that wasn’t quite the right shade of blue or a satin that would have looked good but would have been very difficult to work with on such a small scale. I decided to use an outgrown tee shirt in the right color for ease of sewing and dressing the doll. Since I’ve made a few other dresses for this doll, it wasn’t too hard to draft a pattern that suggests the general look of Rosalina’s dress. I used a thinner white cotton knit for the trim, using the inherent trait of knit fabric to roll over in my favor. It’s a bit rough but I spent about as much time as I’m willing to spend on a doll dress. Done is better than perfect.

Groovy girl soft fabric doll dressed as Rosalina from Super Mario Galaxy hand sewn handmade Rosalina dress Super Mario Galaxy

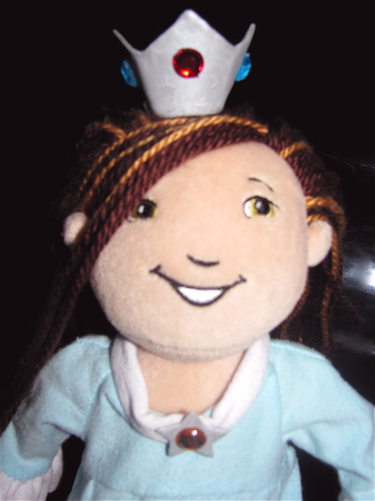
The star brooch and the crown are made from Sculpey molded over a paper skeleton, baked and brushed with silver paint and decorated with plastic jewels. I had intended to make those accessories out of fabric as well but I couldn’t find anything remotely suitable. Hopefully the paper skeleton inside the polymer clay accessories will give them some chance of survival.

hand made Sculpey polymer clay crown and brooch for Rosalina Super Mario Galaxy

Not that I’m particularly a fan myself, but I suppose this could be considered fan art. Or fan craft. Or something like that.

And yes, Sarah has big feet. Maybe I should have made the dress a little longer.

Tags: , , ,

« Older entries