remnants

You are currently browsing articles tagged remnants.

avocado green, light blue, white, dark brown fabric prints

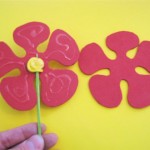
I’m gearing up to decorate my “studio” and I’ve chosen a palette of colors. The walls are a very pale butter yellow which I will keep. I think I’ll be using these fabrics as accents. They have similar avocado-y green tones, light blues with a hint of aqua and dark browns. I have some dark brown and blue canvas as solids and a great deal of the trees on blue print. That one may get used for curtains. Anyway, spur of the moment I decided to use a bit of one of those remnants to make something pretty.

make your own insert for refillable tape dispenser

Here’s my “new” refillable tape dispenser. I simply removed the paper label from the inside and used it as a template to cut out cardstock-backed fabric inserts. You could also use any pretty paper you might have. It’s really quite simple but here’s a tutorial if you’d like a little more direction. I’m practicing making tutorials. :)

Tags: , , ,

fabric remnant used as padding for a package

While putting together some packages to mail out, I was looking for a little extra padding to protect the gift I was mailing and noticed a pile of small fabric scraps. They all happened to be cut in rectangles, maybe 12 x 18 or so. Certainly enough to make a little something, but what? So rather than leave them sitting there, I used one to add a little extra padding around a gift before putting it in an envelope. I didn’t bother to finish the edges of the fabric remnant since I was sending it to a friend who sews. So she’ll get a colorful wrapping that she can then reuse for a little project!

Tags:

fabric gift bags with sewn in ties made from scraps

I made these quick little fabric gift bags out of remnants. I originally made a cross back baby jumper from this fabric for a friend’s daughter. My girl inherited it and I think it’s since been passed on to someone else!

Anyway, I hate to throw away scraps and these pieces were probably only 4 x 6 maybe. I did a rolled hem on the top edge with the serger and then stuck the ribbon in the seam as I sewed. Faster than a drawstring bag but you can’t lose the tie either! There is a better description on how to make these bags by Betz White. You could even make these with the iron-on hem tape if you don’t sew, just don’t put anything too heavy in it just in case!

Tags: ,

self lined drawstring bag with knitting project
This is the shoe bag tutorial I promised a long time ago. I realized that although I first made it as a shoe bag, it really could be used for anything. Here I have one just the right size for holding a ball of sock yarn, and the sock-in-progress itself. I can pull the knitting out, pull the drawstrings onto my wrist and knit and walk at the same time. It’s sad, just goes to show how suddenly obsessed I am with knitting.

This self-lined drawstring bag is a great way to use pretty remnants of any lightweight fabric. It makes up easily in quilter’s cottons, flannel, satin or velvet, even a salvaged length from a favorite garment. You can piece your fabric to make up enough length or to have a contrast lining. You can even add pockets to the inside or outside before making the bag for even more versatility. A shoestring, ribbon, twill tape, cord or what-have-you can be be used as the drawstring. These make great gift bags especially in smaller sizes and can also be made as a purse for a young girl or a treasure bag for boys. Make one to hold the pieces of a game whose cardboard box is disintegrating. Custom size bags to store craft tools or projects, lingerie or shoes. There are no raw edges, no handsewing and the bag can be used inside out as well.

There is no pattern. It’s just a rectangle, you choose the size for your application. Grab some favorite remnants and the tutorial and make some cute bags. And if you use this pattern, e-mail me a picture of your bag! I’d love to see what you come up with.

Tags: ,

floral and turquoise cyclette bag

I’ve decided to name this bag the Cyclette Bag since it was inspired by cyclists’ musette bags. The two words contract nicely into “cyclette”, which is the French word for bicycle anyway! This one was made a little differently than the original bag to accommodate the constraints of the remnants I was working with so I did not take step-by-step photographs. It is essentially the same construction but inside out to allow the lining to show at the top of the bag creating a contrasting band.

I have to admit that sewing this second one gave me fits. First, I was working with some very meager remnants of Amy Butler Nigella grandiflora home dec fabric and some slightly less meager remnants of a brilliant turquoise brushed cotton twill. So I had to fudge my pattern a bit to get everything to fit and I made one small miscalculation which caused me to have to hand sew a spot which of course was one of the things I was trying to avoid with this pattern construction! C’est la vie – I am pleased with the results anyway. The interior pocket is lined with a bit of the floral print for a nice surprise contrast. And as I was doing the topstitching to secure the strap, I decided on the fly to stitch a leaf shape into the box. I love this subtle detail and how easy it was to incorporate a little something to tie the print to the solid besides the shared color. I’ve been toying with the idea of adding a single snap to the bag but I can’t decide. I’m trying to keep it simple.

cyclette bag made from Amy Butler nigella grandiflora

cyclette bag made from Amy Butler nigella grandiflora

interior pocket showing print lining

interior pocket showing print lining

topstitched leaf detail on strap of cyclette bag

topstitched leaf detail on strap of cyclette bag

Tags: , ,

craft foam flowers

I really can’t draw but I’m trying to learn. Having two kids who want me to draw something fast with fat crayons really helps. You can’t think too much you just have to draw something that has the simplest relevant details. I always draw the same sort of flowers, large round center with five round petals crowding around the center. It’s taken me about three years to get the petals all about the same size and shape. Today when the girl asked to make flowers I almost drew those same old flowers. Then I decided it was time to try something different. Without looking at anything I took a pen and drew on some craft foam (yeah that stuff I don’t really care for). Admittedly I had to sketch it several times before I had a decent shape I could cut out but it’s totally different! Almost modern looking. I also attempted a different leaf shape than my standard teardrop. Here are a few pictures to illustrate the process of making the flowers less two dimensional. I’m also including a printable PDF with the patterns and instructions to make your own craft foam flowers or simply print, color and cut on sturdy paper. When I traced the flowers into bezier curves in Freehand, I did my best to retain the loose hand drawn shape of the petals. You’ll notice one of the petals is quite lopsided, almost like a boot shape, makes it easier to line up the mirror images!

PS. I also apologize for the fuzziness of these pictures. I’m trying to work on using natural light because that usually produces truer colors but I was having a hard time getting good focus at the same time.

PPS. A good way to use up those leftover bits of colored paper and craft foam is to cut them into relatively small pieces and use them to make a mosaic on black paper. Kids love this!

Tags: , ,

ruffled skirtAnother skirt for the girl . . . again made from those 9″ wide remnants. This is a beautiful butterfly print several years old from Mary Hopkins by Kona Bay.

I used the ruffle foot on the serger to gather and attach the ruffle at the same time! Now I know there are plenty of people who think this is old hat but for those of just getting into using our sergers, this is really cool. This makes it so easy to do ruffles. No pinning, hardly any fussing. Just have to remember to hem the ruffle before applying and write down the tension settings. I’m going to start pinning those up on my idea board. I’ll take a picture of that soon, when there’s a little more on it!

Also, I figured out that a wooden clamp style pants hanger works great for holding up the kids’ elastic waist skirts and pants to take pictures. Now I just need to work on my photography skills.

Tags: , ,

making heart shaped crayons

I know this post is probably a little late, seeing as it’s 11pm EST on Valentine’s Day but I’m posting it anyway. We did these earlier in the week, I just haven’t had time to upload the pictures.

The boy and I, with help from the girl, made heart shaped crayons for Valentine’s day for all their school and church friends. This is quite easy to do and you can use up the broken crayons this way. There are lots of instructions already available on the web but I will give my method and suggestions having done it several times now. The easiest way to make your own heart shaped crayons is to use:

  • Crayola brand crayons*
  • silicon mini muffin molds in any shape
  • toaster oven at 300°
  1. First peel the paper off the crayons. Using a craft knife to slice down the paper makes it much easier. If you are using new crayons, you will need 9-12 crayons to fill 6 wells of a mini muffin tray.
  2. Cut up your crayons with craft scissors or a kitchen knife. If you are making single color hearts it doesn’t matter how small the pieces are as long as they fit in your molds. If you are using multiple colors, I like to cut them into 1/4 inch to 1/2 inch size pieces depending on the size of your molds.
  3. Silicone molds are the easiest because you can easily pop the finished crayons out when they are fully hardened. If you use a metal tray, stick it in the freezer for a few minutes and the molded crayons should come out fairly easily. In either case use at least a layer and a half of crayon bits to make a 1/4 inch thick molded crayon. More bits makes a thicker crayon. Do not fill all the way to the top of the mold!
  4. If you are using individual molds, like I did, place them on a cookie sheet so you can easily slide them in and out of the toaster oven. Be especially careful when removing from the oven as you want your pretty colors to stay separated. Stirring the melted wax is not necessary and will leave a mark on the other side. Depending on your oven and the size of your molds it can take 5 to 10 minutes for the crayons to melt.
  5. Allow the molded crayons to cool fully before unmolding. Be patient!

The bottom side will be the prettier side. Any little edges sticking up can be smoothed by simply sliding the crayon over paper. I like to use two to three complimentary or analogous colors. But experiment and find your own favorite combinations! Pair a handmade molded crayon or two with a little notebook for a nice little gift any time of year for a friend of any age. Everyone should draw with crayons, not just kids!

*If you have used other brands of crayons there will most likely be a layer of clear/cloudy wax that hardens on the top. This is not pretty and it’s frustrating to kids. You can fix this by very carefully sliding the crayons across a vegetable slicer until you have removed the clear layer.  This will actually make the inferior crayons draw better than before because the process concentrates the pigments and removes excess wax.
It’s also prudent not to use the same tools for food and for crafting. I admit to not always being prudent. eek!

Tags: , ,

lego play tray

lego play tray

I’m not exactly sure when I built this but within the last month or so. I think I’ve mentioned previously that it was a Lego Christmas and then after Christmas my husband dug out his old Legos and added those to the pile. Soon we had far more Legos than would stay neatly on my favorite bankrupt airline food service-turned-crafting trays. But with a tile top kitchen table and wood floors everywhere we desperately needed something with a lip to keep stray Legos from skittering away into oblivion.

So I went down into the basement and dug up an old corkboard and an old artist’s canvas that happened to be the same size, about 2 feet by 3 feet I think. I’d been meaning to recover the corkboard with fabric and paint it or something but that hadn’t happened in several years so I decided to get over that idea and use it. The canvas was rotting off the frame so it was quick work to pull that off, a little slower to remove all the staples and the corner braces. I cut a piece of spare neoprene to fit the depression on the corkboard and then glued some leftover nylon boat canvas on top of that and screwed the emptied frame on top of that into the corkboard’s frame.

The whole thing is light, , super easy to clean, fits behind or under the sofa and can hold a lot of Legos. Don’t ask me why I have spare neoprene, I don’t remember but it comes in handy! I’ve been very pleased with how well this tray works for the kids, especially considering everything I used was leftover or salvage. I suppose it might be nice to paint or seal the frame . . .

Tags: , ,

shrink plastic heart charms

While the boy was gone to school, the girl and I worked on shrinking some pink. I drew and cut out the shapes for her and she colored them. The toaster oven works well for any pieces of shrink plastic up to half sheet. All I had was an unknown brand of matte white but this also comes in clear and black and some can even go in your inkjet printer! This is great for making coloring sheets for little ones. We made these rings and heart charms from the remnants of the planets. I won’t include a tutorial here as there are lots of good ones already available.

shrink plastic rings

Tags: , ,

Here’s the girl wearing a pillowcase I made for her for Christmas. I finally figured out that she doesn’t like the flannel pillow case even though she does like the flannel sheets. So I pulled this sweet pink cherries print out of my stash and matched it with a light green border left over from another project. The boy got a similar pillow case made to match his train quilt. This was an incredibly fast and easy project. And I can see how it will be nice to have extra pillow cases for overnight trips and such.

Tags:


I sewed a few little skirts as Christmas presents for my niece and the girl was a bit sad to see them go so of course I had to make something for her too. Since I have so much fabric, I have been trying hard to use what I have and not buy anything new. So this skirt was made from nine inch wide remnants. I actually watched the DVD that came with my serger to figure out how to make the doubled ruffle. Pretty nifty. I used some hempcel for the ivory trim and lining. For the waist I used some buttonhole elastic to make the waist adjustable. It was pretty simple to sew it in a continuous loop with the excess coming out the back seam in the lining. If the skirt gets too short I can always add a longer ruffle to the lining to add length. I liked how this came out and plan to make a few more, with variations of course. No pattern, it’s just two tubes of fabric about 1.5x the waist, sew the ruffle on the bottom of the outer fabric. Sew the two tubes together right sides together round the top. Turn and topstitch the edge and then again down about an inch or however wide your elastic is. Don’t forget to leave the side or back seam open where you want to insert the elastic.

Tags: , ,

My mother went to Japan for a visit with her family and brought back a cute little doll for the girl. I had asked for something more little girlish than what is common here in the States. So Blythe needed a bed or so I was informed by the girl. So since petite Blythe had made the trip from Japan I decided to make her a futon as her bed and a pillow and blanket to match. All were made from scraps, and I do mean scraps. Both of these were left over from making a toddler dress out of a 1/2 yard of fabric so you know there wasn’t much left!

Tags: ,

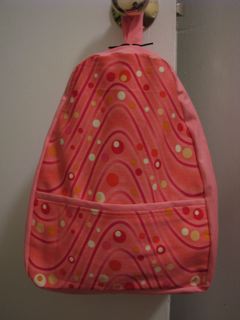
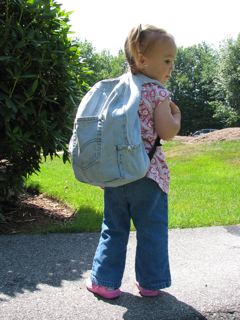
The girl had been asking for a pink backpack for some time, just like her brother’s. His was made a few years ago from an old pair of my jeans. I threw it together without a pattern but it lasted through two years of pre-school and it’s still his go-to bag for going on a trip. I took the time to make a pattern for the girl’s bag. This was particularly important because I was using some narrow remnants of a mod pink swirly canvas. I used a coordinating plain pink canvas for the sides and shoulder straps.  I pulled the zippers and hardware out of my stash. The first backpack used hardware and webbing salvaged from a damaged-beyond-repair bag. I used the shoulder padding from the old bag for both backpacks.

Tags: , , ,

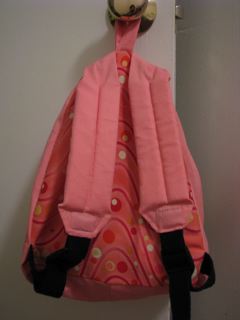
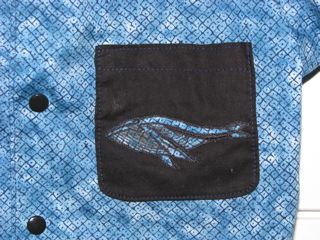
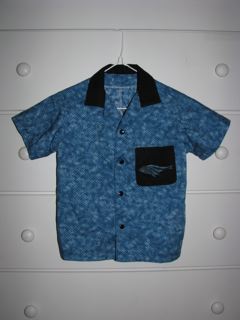
This shirt started out as 9″ wide scraps of Kona Bay faux shibori pattern cotton fabric in a lovely shade of ocean blue. I thought it was perfect for a summer dress shirt for the boy but I was limited by the size of the scraps I had. I fiddled around a bit and managed to eke out the body pieces by piecing the back of the shirt and cutting the collar and pocket from contrasting black. Rather than buttons, I applied black resin snaps to complement. I appliqued a humpback whale to the pocket and drew in the details with my favorite permanent fabric pen, Identipen.

Tags: , , ,

Newer entries »