embellishing

You are currently browsing articles tagged embellishing.

Our church received a request over the weekend for Christmas help for a family with young children. Several of us coordinated getting various things to “make Christmas”. I went looking for stockings and was appalled at the selection available in the big box store. Most of the stockings available were cheaply made of such grotesque fabric that I was depressed that anyone would use those as part of their family traditions. So despite the deadline projects hanging over my head I went home and started pulling out the ingredients to make some personalized stockings.

handmade Christmas stockings

I cut the main body of all three stockings out of a thick red textured fleece and then pulled together a few wintry prints to make the contrasting heels, toes and cuffs. The boy helped me with the sewing. I was planning on using a white dimensional paint to write the names on the stockings but I did not read the directions until about 10pm. Since I didn’t have 24 hours for the paint to dry flat I had to come up with another plan! After fooling around a bit I pulled out the last piece of matte shrink plastic and the permanent markers. I picked out some (hopefully) appropriate typefaces to set their names in on the computer and then printed out a template to trace. A few seconds in the oven and a quick rubdown with the sandpaper, and I had some nice thick white ovals that I stitched onto the stocking cuffs with black upholstery thread. Although putting the names on shrink plastic tags was a last ditch idea, I like how well it turned out so I will probably find some way to use it again.

Christmas stocking with shrink plastic name tag

Tags: , , ,

pink tie dye shirt with scattered daisies

Please excuse the silly look on my face. Rich told me I looked too serious. An old white shirt freshened up with pink on pink tie dye and then embellished across one shoulder with a little daisy rubber stamp using fabric inks. And a little frog hiding in the daisies at the hip.

rubber stamp with fabric ink on tie dye shirt rubber stamped frog and daisies embellish tie dye shirt

Tags: , , , , ,

All of the pink/purple was done this week, other colors were done previously. I did all of the stamping/embellishing last night, heat fixed by Rich. These baby clothes are going out all over the continent (literally) to his friends. There are a few more but I’ll save those for another post.

onesie:
baby onesie tie dye with butterfly and matching socks

onesie:
butterflies stamped on tie dye baby onesie and matching socks in pink and purple

detail:
detail of stamped butterflies on pink and purple tie dye baby onesie

twinkie rompers:
pink and purple tie dyed baby rompers with matching socks

baby gown:
pink and purple tie dye baby gown with matching socks

and my favorite seaglass colors:
green and blue baby boy onesie with little frogs

with frog detail:
stamped and colored frogs on blue/green tie dye baby boy onesie

Tags: , , , ,

long drawstring skirt made from fringed rayon jacquard scarf

This was originally a very long (72″ x 28″?) rayon jacquard scarf with fringed ends. I believe it came from Nepal. It’s a coral sort of pink color. Not something I would normally pick for myself but for some reason I really like it. I know I was not going to wear it as a scarf so I decided to make it over into a skirt.

The fabric is lusciously soft and drapey and I was terrified to cut into it. I pinned and pressed very carefully to line everything up and then cut out a few inches of the middle to make the skirt the right length for me. I sewed up the side seams, finished the top edge and turned it over to encase 1/2″ elastic and a drawstring cord. Very simple.

The drawstring cord took a bit of time because I had a foolish notion to unravel the few inches I had cut off and twist the long weft threads into a cord. It worked but it wasn’t as neat as I had hoped it would be. With the help of my spindle I plied it and then doubled it again and threaded the ends with some olivewood beads from Israel. Surprisingly the drawstring is stronger than it looks. If it doesn’t last I’ll just find some matching pearl cotton.

wood beaded drawstring cord on jacquard skirt

Tags: ,

I discovered that my summer wardrobe is missing sleeveless shirts so I decided to make one quickly by refashioning a well-loved long sleeve tee shirt. This shirt may be 10 years old, made by the GAP originally, always long lasting. It was finally getting a bit ragged around the neckline and cuffs though so I cut the sleeves off, cut the neckline lower and used Made By Rae’s ruffle treatment around the neckline. It came out pretty well and comfortable in the sunnier weather we’ve been having. My 3.5 year old daughter kindly took the photo for me. I don’t usually like having my picture taken but she did a great job so I’ll share it with you, tilt and all. :)

ruffle trimmed tank top refashioned from long sleeve tee shirt

photo credit: the girl

Tags: ,

techno geek baby girl onesies

A baby shower was held at my husband’s office this week in honor of a new baby girl soon to arrive in the household of my husband’s cohort in all things computer. The theme was appropriately “techno geek”. My husband and I tossed around some ideas for decorating onesies—the staple of the newborn wardrobe.

ASCII flowers on a baby onesie hexadecimal color for pink on a pink circle on a baby onesie

We ended up firing up the heat press and using transfer paper to embellish the first onesie with a colorful garden of ASCII flowers. Those of you my age or older may remember making similar pictures on a typewriter in typing class! The second onesie sports a large pink dot with the hexadecimal (web) color number used to specify that particular shade of pink to computers. Apparently one of the adults wanted one of these in her size. We may need to oblige as I am thinking I might want one for me as well! It could very easily be made for boys too of course.

Tags: ,

If you’ve ever made your own bias trim or piping, you’ll know that it is not the easiest task but produces a most rewarding and unique embellishment. My 1953 Singer Sewing Book makes reference to a bias cutting gauge made by Singer which could be clipped to your scissors to automatically cut the perfect width strips of fabric.

illustration of bias cutting gauge

Intrigued I searched the internet to see if I could purchase one of these handy gadgets. I found a vintage example for sale at a ridiculously high price. Karen of OneGirlCircus, found a modern version at a very reasonable price, but while quite adjustable, it seemed rather large in comparison and frankly, I was reluctant to pay the shipping to buy one item.

So, of course the next logical step (for me) was to attempt to make my own. The first version was quickly bent out of a leftover piece of metal flashing (that would be the kind that goes on your roof). Worked great, a little flimsy, not so attractive.

diy bias strip cutting guide/gauge handmade bias cutting guide

Version two was formed out of a flat bobby pin. Bingo, definitely a winner—slim, smooth and easy to use. Now just today I ran across a much better photo of a vintage version which shows how it was adjustable. I think with a little tinkering I can incorporate that into the next version. I’m not sure which excites me more, having this great new tool or the fact that I figured out how to make it myself!

DIY bias cutting gauge
using the handmade bias cutting guide

Tags: , ,

The boy finally lost his first tooth this week. I think he was feeling a bit left out as quite a few of his friends had already lost their first teeth. There was much dancing and singing. While the boy was gone to school I decided to make a tooth pillow so the “tooth fairy” would be able to find the little tooth under the boy’s pillow that night. I thought about doing some needle felting but ended up using embroidery floss to stitch a little face on the tooth and blanket stitch to stitch the tooth shape onto the pillow and finish the edges as well. I left a little opening at the top of the tooth big enough for a quarter (according to the song the boy learned in school, bless that music teacher!)

hand made felt tooth fairy pillow

I don’t do embroidery or cross stitch too often but occasionally I like to do it, especially on a small project like this where there are immediately satisfying results. After I was done with the tooth pillow I was reminded of this Japanese craft book that my aunt gave me years ago. It’s full of adorable felt people, animals and plants. The boy and the girl have already picked out projects for me to do, of course.

Japanese craft book of felt people, animals and plants

Tags: ,

empty black velvet lined boxes


I scored a few of these previously used black boxes, a little dusty but sturdy. They are some sort of thin but hard board covered in faded black paper and lined with foam covered with cheap velvet. (I’m sure these will be very easy to gut.) Some of them have little latches and some of them have self-closing hinges. Some are approximately 5×7″ and others are 6×8″, about 2.5″ deep. I didn’t know what I would do with them but obviously they have great potential. The girl appropriated one for her little dolls as soon as I got them in the door!

So I’m throwing this out there to my readers. What would you do with one of these? I’d love to hear your ideas on how you might decorate the outsides and what you might put inside. I’m thinking treasure boxes, photo storage, special gift packaging, triptychs, memory boxes, craft tool cases, decoupage purse. What are you thinking?  Leave me a comment by May 5th and I’ll be giving a few of these out.** Feel free to spread the word, I want to hear lots of ideas!

**Two catches – I’ll want you to e-mail a picture of your finished project to post here on my blog by May 31 and I won’t be sending any outside the US, because I’m broke, sorry.

lavender tulips in a metal bucket
just because they’re pretty ;)

Tags: ,

A skirt for me. Wow, it’s been a while. This skirt has a lot of features that I wouldn’t normally wear or sew for myself. First I used a conversation print – Alexander Henry‘s Starlings. I rarely wear prints at all. I also used red! as a secondary accent to highlight the red in the print and contrast with the main fabric of the skirt which is denim. I also appliqued one of the birds to the back waist, I don’t know why but hopefully it looks cute in a good way. I can’t think when was the last time I used piping and I’m sure it wasn’t on a garment for myself. I was originally going to use bias tape as the edging but went with the piping after seeing Rae’s use of piping on a child’s backpack. It really made the lines of the design stand out.

birdskirtfront birdskirtback

Other details: I’ve never cared for waistbands so that’s not new. But I don’t think I’ve ever done one like this. I cut some of the print fabric on the bias and used it to bind the top of the skirt which also helped reduce bulk since the body of the skirt is made from a hefty 12 oz. denim. The pattern is my own, rough modification of an existing six gore skirt pattern I drafted ages ago. Red topstitching. I love invisible zippers! And a resin snap for the closure. I also fused the lightweight print to white cotton to give it some bulk so it would stand up to the denim and a crisper hand to hold the pleat even when walking. That worked out very well.

birdskirtapplique

I apologize for the grainy pictures, these were all taken at night and Frances (my dressmaker’s dummy) was a bit tipsy as well. And unfortunately the skirt turned out a tad big despite stopping for a fitting midway. Oh well. Maybe it will shrink in the wash. (I pre-washed the fabrics of course.)

I need to thank FW and the gals on designer-stashers for turning me on to new fabrics and for hosting a skirt sew-along which is probably the only reason I got this done! And finally, the skirt on the reluctant model, wearing some eye-brow raising 70s looking clogs scored from DH’s office. (Amazing things turn up when you are cleaning out an advertising agency. :) )
birdskirtside birdskirtfrontview

Tags: , , , , ,

img_3182Did that title make any sense at all? I suppose this is somewhat of a review. I originally got this paper-backed fabric for use with inkjet printers for another project. I used it this week to make labels for some baby carriers I donated to a not-for-profit group, HUGS. HUGS is run by two sisters who sell selendangs through their website. A selendang is a traditional piece of cloth used in Indonesia for many purposes, one of the most important being carrying babies. The sisters then donate the profits back to providing traditional selendang baby carriers to mothers in need, mainly in Indonesia I think. Go check it out, a really lovely family effort.

Anyway, you are wondering what this has to do with me printing fabric labels on my inkjet printer. I purchased and used some of the beautiful HUGS fabric to make into more structured two shoulder carriers. I wanted to put their logo on the strap so I decided to try out this product, PhotoFabric from Blumenthal Craft. I think there are many other brands of this same type of stuff. While the colors could have been more vibrant, I was impressed at the detail I was able to get, 5 point type was perfectly readable. I cut out the labels and turned under the edges with the iron and then sewed them on. It worked very well and looks nice. I test washed one of the labels and it did not bleed at all even under hot water.

You can also draw easily on this paper with colored pencils, which makes it great for kids. You can take their drawing and incorporate it into a sewn fabric creation. I’m curious to see if it can withstand machine washing. If so, I’ll certainly be using it to put “made by mom” tags into my kids’ clothes!

Tags:

This faux suede/sherpa coat came to us in a bag of hand-me-downs from a friend. The shoes used to belong to the boy but were now the right size for the girl. Unfortunately Miss Picky only likes girly shoes. In an effort to get her to wear something that would be safe for running around in I decided to embellish the shoes and jacket to match with some autumn colored leaves. Since I really can’t draw I looked online for some inspiration and came up with a few pictures of leaves on branches that I could use to make my own design. I used my Tsukineko fabric inks in empty markers from Dharma Trading. These are absolutely great for someone like me who is not so handy with a paint brush. Pencil didn’t work so well on the suede so I took a deep breath and my chosen colors and worked freehand. I love the way this project turned out and the girl wears this coat every chance she gets. She even wears the shoes!

The front of the jacket and details of the pocket, the shoulder and the shoes:

Tags: , ,

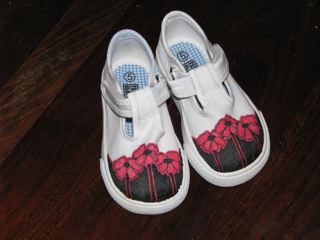
Usually you buy the shoes to match the outfit right? Well…in this case I had picked up a pair of white mary jane style tennis shoes on sale with the idea of decorating them in some way for the girl. I had in mind to do something with red to go with several red outfits in her wardrobe. For several years I have had an image of a graphic flower in my head but didn’t know what to do with it. It came to mind and after quite a few pencil sketches, I got out the fabric dyes (Tsukineko all-purpose) and went to work on the shoes freehand. Even though I’m a graphic designer by training, I really can’t draw so this was quite an accomplishment for me.

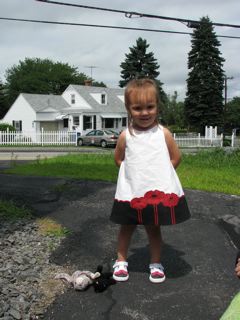
After I finished the shoes I realized that they were not going to look right with any of the cute red outfits she already had so then I had to make a dress to match the shoes. I drafted a simple A-line shift pattern and used fusible web and a zigzag stitch to apply the variegated red and black border on the white dress. The poppy-like flowers are set off-center. While I’ve used fusible web to applique before, this was a much more complicated process and I did go a bit crazy cutting out all the right pieces! Not pictured is the very cool elastic keyhole neck in the back. My independent girl prefers to dress herself so rather than use a button or snap closure, I made a small casing at the top of both sides of the keyhole opening and inserted elastic. When worn, the elastic does not show at all. I should have a picture of that huh?

Tags: , , ,

Newer entries »