color

You are currently browsing articles tagged color.

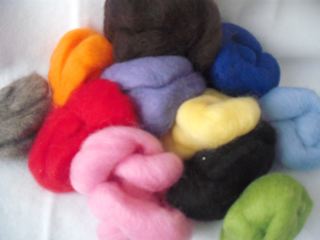
wool roving colors
wool roving colors

I’ve been looking for this bag of wool roving for a felting project I’ve been working on. I can’t remember when I got it or where but it’s been handy to have all these yummy colors for little projects. I didn’t pack up my craft stuff very well when we moved so unfortunately I can’t find the things I want most of course. In the same box I also found lots of hand sewing needles, yay! thread, buttons, elastic thread, yay again! and various knitting needles and crochet hooks, triple yay! Now I have to find an organized place to put all this stuff. Sigh. Now, if I could just find the drop spindle. I’m seriously considering laying it all out on the driveway in the spring so I can sort it out properly.

Tags: , ,

corn with red peppers

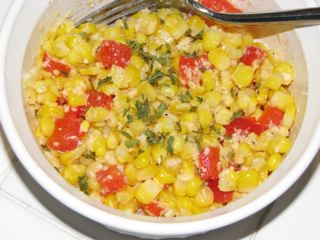
corn with red peppers

I’m not a big fan of corn so I generally throw something extra in to liven it up. Usually that’s green peppers. I steam frozen corn in the microwave and then throw in fresh diced peppers raw. I don’t care for cooked peppers so much, they usually lend a little too much of their flavor to the rest of the dish. Tonight I had some red pepper on hand so I threw that in to the corn instead. Then I tossed in some grated parmesan and a little caesar dressing. Now that was some goooood corn! And it looked pretty too.

Tags:

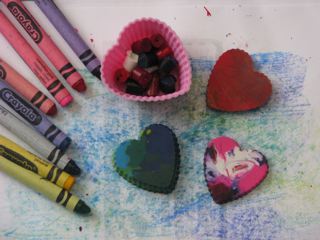
making heart shaped crayons

I know this post is probably a little late, seeing as it’s 11pm EST on Valentine’s Day but I’m posting it anyway. We did these earlier in the week, I just haven’t had time to upload the pictures.

The boy and I, with help from the girl, made heart shaped crayons for Valentine’s day for all their school and church friends. This is quite easy to do and you can use up the broken crayons this way. There are lots of instructions already available on the web but I will give my method and suggestions having done it several times now. The easiest way to make your own heart shaped crayons is to use:

  • Crayola brand crayons*
  • silicon mini muffin molds in any shape
  • toaster oven at 300°
  1. First peel the paper off the crayons. Using a craft knife to slice down the paper makes it much easier. If you are using new crayons, you will need 9-12 crayons to fill 6 wells of a mini muffin tray.
  2. Cut up your crayons with craft scissors or a kitchen knife. If you are making single color hearts it doesn’t matter how small the pieces are as long as they fit in your molds. If you are using multiple colors, I like to cut them into 1/4 inch to 1/2 inch size pieces depending on the size of your molds.
  3. Silicone molds are the easiest because you can easily pop the finished crayons out when they are fully hardened. If you use a metal tray, stick it in the freezer for a few minutes and the molded crayons should come out fairly easily. In either case use at least a layer and a half of crayon bits to make a 1/4 inch thick molded crayon. More bits makes a thicker crayon. Do not fill all the way to the top of the mold!
  4. If you are using individual molds, like I did, place them on a cookie sheet so you can easily slide them in and out of the toaster oven. Be especially careful when removing from the oven as you want your pretty colors to stay separated. Stirring the melted wax is not necessary and will leave a mark on the other side. Depending on your oven and the size of your molds it can take 5 to 10 minutes for the crayons to melt.
  5. Allow the molded crayons to cool fully before unmolding. Be patient!

The bottom side will be the prettier side. Any little edges sticking up can be smoothed by simply sliding the crayon over paper. I like to use two to three complimentary or analogous colors. But experiment and find your own favorite combinations! Pair a handmade molded crayon or two with a little notebook for a nice little gift any time of year for a friend of any age. Everyone should draw with crayons, not just kids!

*If you have used other brands of crayons there will most likely be a layer of clear/cloudy wax that hardens on the top. This is not pretty and it’s frustrating to kids. You can fix this by very carefully sliding the crayons across a vegetable slicer until you have removed the clear layer.  This will actually make the inferior crayons draw better than before because the process concentrates the pigments and removes excess wax.
It’s also prudent not to use the same tools for food and for crafting. I admit to not always being prudent. eek!

Tags: , ,

hand-dyed blue/purple silk hankie from SpinKnit

hand-dyed blue/purple silk hankie from SpinKnit


I have these gorgeous silk hankies coming from SpinKnit. Annie is a dear friend of mine who has recently discovered that she is an amazing fiber artist! She has many other talents as well. She’s currently selling lots of hand dyed and spun natural fibers to fund a trip to help build houses in Mexico. See her story about her previous trip. So in her description she says:

These “hankies” or “mawata” are great for spinning, felting, needlework, pulling thin and knitting straight from the fiber or many other projects.

While I do have an old hand spindle around somewhere I really do not know how to spin. I’ve done a little felting with wool, never tried it with silk. I’m not so great at knitting either! Any suggestions for me?? What would you do with these beauties?

hand-dyed silk hankie in yellow and orange from SpinKnit

hand-dyed silk hankie in yellow and orange from SpinKnit

hand-dyed silk hankie in blue-green from SpinKnit

hand-dyed silk hankie in blue-green from SpinKnit

Tags:

Speaking of my friend Jan, she taught me how to tie dye. We get together every so often and do a batch for fun and for gifts and sometimes to revive stained kids clothes that still have life in them. We get most of our supplies including clothing blanks and dye stuff from Dharma Trading. I tried out a new colorway here: red/tangerine/blue. I like it quite a bit. The itty bitty socks were dyed to coordinate. Aren’t they cute?

Tags: , ,

Because my dad was in the Navy, we moved around a lot when I was a kid. I was well schooled in not doing any kind of decorating that might be unattractive to a potential house buyer. (Keep the walls off-white, etc.) When my husband and I bought our first house, the first thing I did was paint the boy’s room sapphire. Later I decided to paint our room sky blue and accent it with pine green. The blue came out a bit deeper than I intended but the overall effect was quite soothing. I also chose to use nickel colored hardware for the window treatments and other decor. I bought this 4 ft. long shelf and the three square metal tiles on clearance at a craft store. I took the traditionally shaped shelf apart, turned it upside down, put it back together and painted it the same color as the walls. I made my own stencils of various leaf shapes and then stencilled the negative shape with green paint onto the metal tiles. I really like how they looked propped up on the shelf.

Tags: , ,

Newer entries »